How To Add Custom Fonts To Your Squarespace Website
There are hundreds of fonts built in to Squarespace for you to choose from, but if you’re reading this article chances are the font you want to use is not one of them. (Though it is worth double checking because they have a lot of Google fonts and Adobe fonts included by default.)
If you’ve searched in Site Styles and still can’t find your custom font, then you can still add it to your Squarespace site using custom CSS.
Side Note: if you’re trying to add an Adobe font to your Squarespace website (and you don’t already see it in the list of available fonts on Squarespace), the process is different – you can read how to do that here.
Upload the Custom Font File
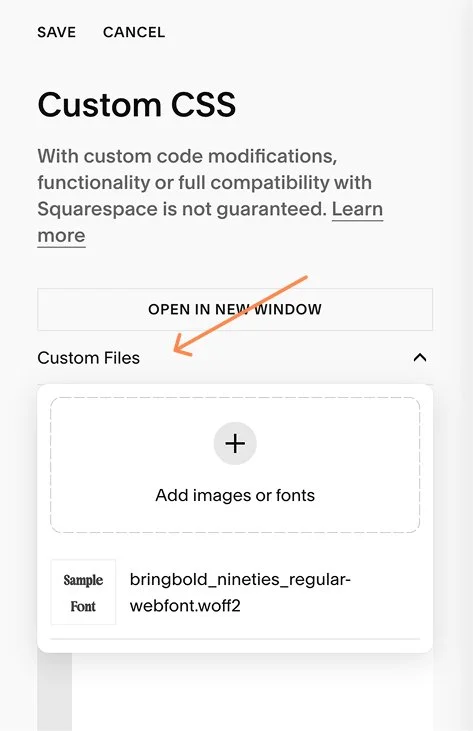
Assuming you have the font file for your custom font (ending in .ttf, .otf, .woff, or .woff2), you would first need to upload the font file to your website. With the current version of Squarespace at the time of writing this article, you can upload the file from the Custom CSS section of your Squarespace website:
Website → Pages → Website Tools (at the bottom under Utilities) → Custom CSS
Alternatively you can also just type / from anywhere in your Squarespace website dashboard to bring up the search bar, and type in CSS to jump to the Custom CSS page.
Click on Custom Files under Custom CSS and upload your font file.
Define the Font in CSS
Next we need to define the font so we can use it in the CSS code. We’ll assign it a name that we can refer to later in the CSS, and link that name to the path of the font file we just uploaded. In the CSS, paste the following code:
@font-face {
  font-family: '';
  src: url('') format('');
}
Inside the quotes next to font-family, type the name of the font. It doesn’t need to be the specific name of the font file, you can really name it anything – you just have to make sure you use this exact name elsewhere throughout your CSS.
Click inside the quotes next to url so that your cursor is positioned in between the single quotes. Next, click the Custom Files dropdown, and click once on the font file you just uploaded. Clicking on a file in the Custom Files menu will paste the file path directly into your CSS wherever your cursor is.
Inside the quotes next to format, type ‘truetype’ if your font file ends in .ttf or .otf, ‘woff’ if your font file ends in .woff, or ‘woff2’ if your font file ends in .woff2.
Your code should look something like this:
@font-face {
  font-family: 'Nineties';
  src: url('https://static1.squarespace.com/static/66ac5f704b40243b1c9d610b/t/6815189b1eff7d3e92ad092f/1746213019259/bringbold_nineties_regular-webfont.woff2')
       format('woff2');
}
Assign Text Styles to Use Custom Font
Okay now we are ready to start assigning the font to whatever text style(s) you want it applied to. There are several different text styles we can use for each text block (as I’m sure you are aware).

So all you have to do is choose the text styles that you want to apply your custom font to (e.g. Heading 1, Heading 2, etc.) and add code to assign the font to those text styles. Each text style has a corresponding selector that can be used to reference it in the CSS code:
Heading 1 → h1

Heading 2 → h2

Heading 3 → h3

Heading 4 → h4
Paragraph 1 → .sqsrte-large

Paragraph 2 → p

Paragraph 3 → .sqsrte-small

Monospace → pre
Note that Paragraph 1 and Paragraph 3 are the only 2 that have a period before them so make sure to include that.
Let’s say I want all the headings except Heading 4 to use this display font. We’re going to type in the CSS the corresponding selectors (in green above) that we want separated by a comma. Then set the font-family to the name you chose above when defining the @font-face. Add !important to force it to override the styles set by Squarespace. Continuing with my example above, here’s how that might look:
h1, h2, h3 {
  font-family: 'Nineties' !important;
}
Now you should see the new font being used on your website.
If you want to change the size of the different text styles (like Heading 1, Heading 2, etc.) you can do that in the Site Styles menu. You can set the sizes of each of the Headings and Paragraph styles from the Site Styles menu, but if you want to change any other attributes on a per style basis (for example, making Heading 4’s all uppercase, or increasing the font weight of Paragraph 3 but not the other Paragraph styles) then you’ll have to use CSS.


If there are any other elements throughout your site that you want to apply the custom font to (like buttons or blog titles) you’d just need to find out the selector to use for that particular element, and assign the font-family property to it in your CSS code. To learn more about how to use CSS in Squarespace you can check out this video.
You can also add multiple custom fonts to your website – but just be aware that this can increase your website’s load time if you add too many.
I hope you found that helpful! If you did and want to say thanks, consider buying me a coffee ☕️